Introduction :
An RFID (Radio Frequency Identification) sensor is a device used to identify and track tags attached to objects wirelessly. RFID systems are composed of two main components: the RFID reader (or sensor) and the RFID tag. The RFID reader emits radio waves that power the RFID tag, which then responds by transmitting its unique identification data back to the reader.
Key Components
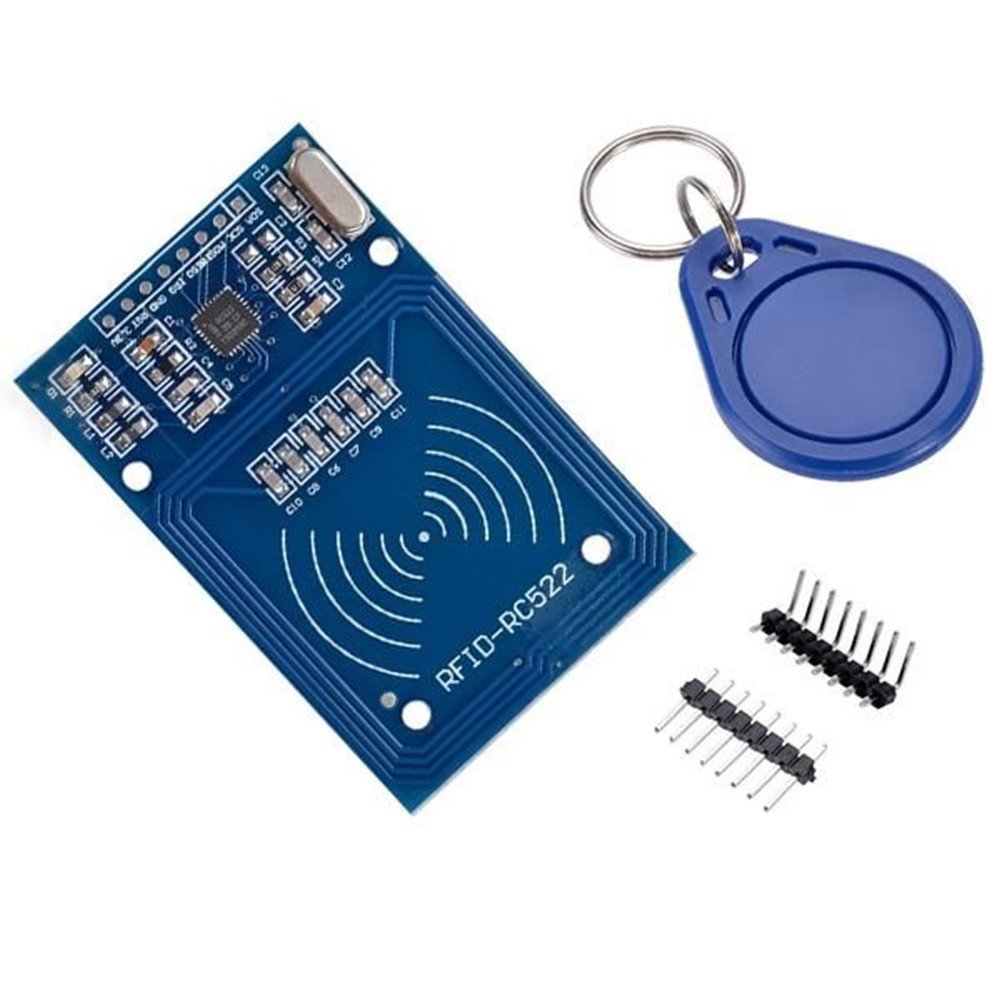
- RFID Reader: The reader (or sensor) sends out radio waves to detect and communicate with RFID tags. One of the most commonly used RFID reader modules in DIY projects is the RFID-RC522.
- RFID Tag: A small chip with an antenna that stores a unique ID. There are different types of tags, such as passive (which do not have a power source and rely on the reader’s signal) and active (which have their own power source).
How RFID Works
- Communication: The RFID reader emits radio waves in a specific frequency range (typically 13.56 MHz for the MFRC522). When an RFID tag enters this range, the radio waves power the tag’s chip.
- Data Transmission: The powered tag transmits its stored data (usually a unique identifier) back to the reader via modulated radio waves.
- Processing: The RFID reader decodes this information and sends it to a microcontroller (like an Arduino) or a computer for further processing.
RFID Reader: MFRC522
The MFRC522 is a popular RFID reader module used in Arduino projects. It operates at a frequency of 13.56 MHz and is capable of reading and writing data to RFID tags.
Features:
- Operating Voltage: 3.3V
- Frequency: 13.56 MHz
- Communication Protocol: SPI (Serial Peripheral Interface)
- Range: Typically 0-5 cm depending on the tag and environment
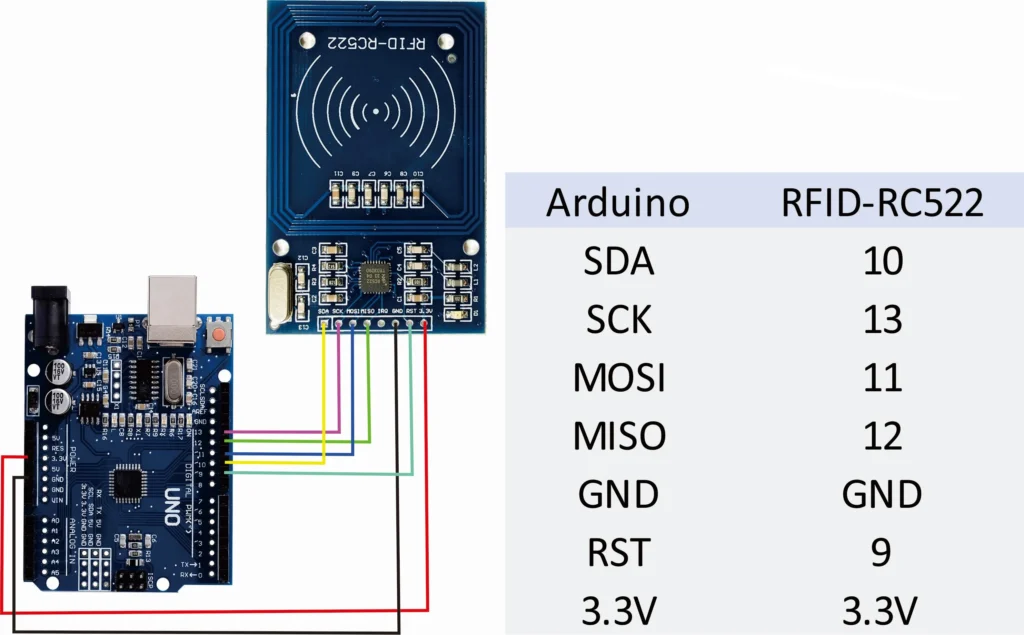
Connecting the MFRC522 to an Arduino Uno
Here’s how you would connect the MFRC522 module to an Arduino Uno:
- VCC: Connect to the 3.3V pin on the Arduino (do not connect to 5V as it might damage the module).
- GND: Connect to the GND pin on the Arduino.
- RST: Connect to digital pin 9 on the Arduino.
- SDA/SS: Connect to digital pin 10 on the Arduino (Slave Select).
- MOSI: Connect to digital pin 11 on the Arduino (Master Out Slave In).
- MISO: Connect to digital pin 12 on the Arduino (Master In Slave Out).
- SCK: Connect to digital pin 13 on the Arduino (Serial Clock)
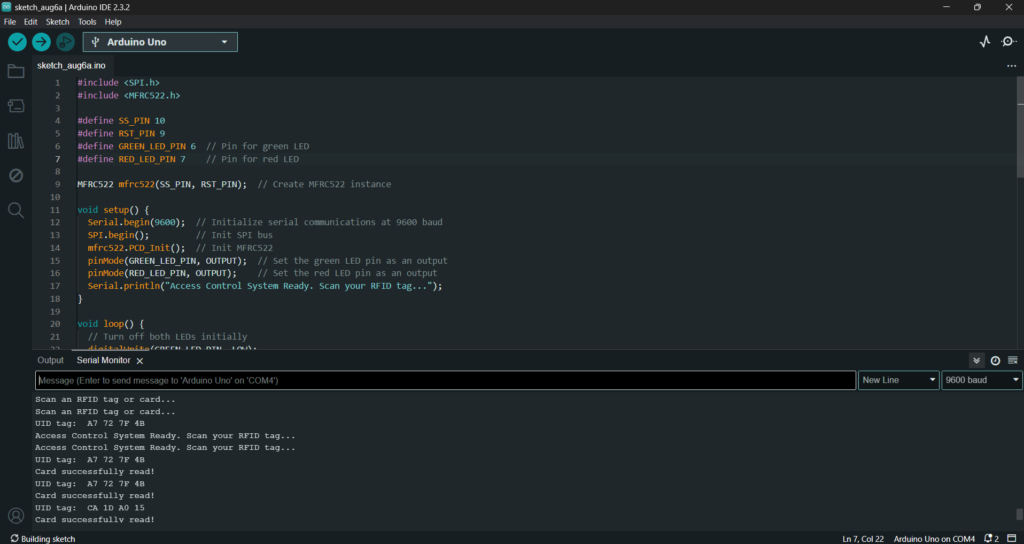
CODE:
#include <SPI.h>
#include <MFRC522.h>
#define SS_PIN 10
#define RST_PIN 9
#define GREEN_LED_PIN 6 // Pin for green LED
#define RED_LED_PIN 7 // Pin for red LED
MFRC522 mfrc522(SS_PIN, RST_PIN); // Create MFRC522 instance
void setup() {
Serial.begin(9600); // Initialize serial communications at 9600 baud
SPI.begin(); // Init SPI bus
mfrc522.PCD_Init(); // Init MFRC522
pinMode(GREEN_LED_PIN, OUTPUT); // Set the green LED pin as an output
pinMode(RED_LED_PIN, OUTPUT); // Set the red LED pin as an output
Serial.println(“Access Control System Ready. Scan your RFID tag…”);
}
void loop() {
// Turn off both LEDs initially
digitalWrite(GREEN_LED_PIN, LOW);
digitalWrite(RED_LED_PIN, LOW);
// Look for new cards
if (!mfrc522.PICC_IsNewCardPresent()) {
return;
}
// Try to select one of the cards
if (!mfrc522.PICC_ReadCardSerial()) {
// If the card fails to read, light up the red LED and display a failure message
Serial.println(“Failed to read card!”);
digitalWrite(RED_LED_PIN, HIGH); // Turn on the red LED
delay(2000); // Keep the red LED on for 2 seconds
digitalWrite(RED_LED_PIN, LOW); // Turn off the red LED
return;
}
// If the card is successfully read, light up the green LED
Serial.print(“UID tag: “);
for (byte i = 0; i < mfrc522.uid.size; i++) {
Serial.print(mfrc522.uid.uidByte[i] < 0x10 ? ” 0″ : ” “);
Serial.print(mfrc522.uid.uidByte[i], HEX);
}
Serial.println();
Serial.println(“Card successfully read!”);
digitalWrite(GREEN_LED_PIN, HIGH); // Turn on the green LED
delay(2000); // Keep the green LED on for 2 seconds
digitalWrite(GREEN_LED_PIN, LOW); // Turn off the green LED
mfrc522.PICC_HaltA(); // Halt PICC
}
https://github.com/makertribe/IoT-Codes/blob/79fc6292652a20f620da79fbfb83ae60d937a128/RFID%20sensor
Library install :
Install the Servo Library (if not already installed):
- Open the Arduino IDE.
- Go to Sketch > Include Library > MFRC522.
OUTPUT: